I love to watch the Great British Bake-Off (GBBO) or as it is called in the U.S. the Great British Baking Show. I think that Mary Berry and Paul Hollywood are great and as presented by Mel Giedroyc and Sue Perkins, and it is easy to see why they won or been nominated for the BAFTA numerous times for the show from 2012 to the present.
In Season 1, episode 2; the theme was biscuits (or cookies as we call then in the U.S.) and during the technical challenge a biscuit/cookie called an "Arlette" was presented. It was an interesting cookie made with Pâte Feuilletée Inversée (Inverse or reverse puff pastry) with a bit of cinnamon sugar. I believe the Arlette originated in the Breton area of France.
An Arlette from Dominic Ansel's bakery in NYC
Arlettes are like a Palmier but inside out and shaped a bit differently. Pastry Chef Dominic Ansel suspects that it was invented at the onset of the 20th century, around the same time as the Palmier, but due to the labor it requires, it lost out in popularity.
The classic Palmier
Compared to the elephant-ear shaped palmier, the arlette looks more like an elongated teardrop, plus it’s thinner, crispier, and darker thanks to the cinnamon. “Texturally,” says Ansel, “an arlette is the opposite of the soft and chewy chocolate chip cookies we’re used to–it should be crunchy and flaky.” If you hold it up to the light, he offers, you should see “nice rings of puff pastry.”
I love puff pastry but rarely make it these days from scratch due to the availability of commercial puff pastry which works perfectly well without the loss of a day making it from scratch.
The recipe is straight forward and if you follow the directions, anyone can make it. That said, my first attempt was not great. They tasted great but they looked monstrous.
I tried a second batch and they came out better.
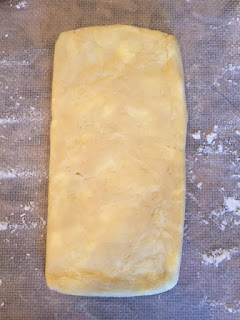
The difference? The puff pastry really needs to be as close to a rectangle as possible always and when roll it up to cut the spirals, the roll must be even or your arlettes will look wonky like my first batch.
I also found that my baking time was much longer than Paul's recipe calls for so it's better to bake them until they start to get golden brown - in my case it was about 3 times longer than Paul's recipe.
Once baked, they must sit until completely cool so they can crisp up because directly out of the oven, they will be very soft.
Here is Paul Hollywood's recipe:
Ingredients
For the dough
60g/2¼oz strong white bread flour, plus extra for dusting
60g/2¼oz plain flour (all-purpose flour)
1 tsp salt
40g/1½oz unsalted butter, melted (I used Kerrygold Irish Butter)
For the butter layer
125g/4½oz unsalted butter, at room temperature
25g/1oz strong white bread flour
25g/1oz plain flour
For the filling
50g/1¾oz granulated sugar
2 tsp ground cinnamon (I used roasted Saigon cinnamon)
icing sugar, for dusting
Method
Put the flours, salt, butter and 50ml/2fl oz cold water in a bowl and gently mix to form a dough.
Transfer the dough to a lightly floured work surface and knead for 5 minutes until smooth. Shape the dough into a square, wrap in cling film and chill for an hour (or freeze for 20-30 minutes).
For the butter layer, cream the butter and flours together using an electric mixer. Sandwich the mixture between two sheets of cling film and roll out to a rectangle the same width as the square of dough, but twice as long.
Chill in the fridge for 25 minutes.
Unwrap the chilled dough and butter layer.
Place the chilled butter layer, short end facing towards you on a lightly floured surface and place the square of dough in the centre of the butter sheet.

Make sure it is positioned neatly and covers almost to the edges.
Lift the exposed butter sheet at the top and fold it down over the dough, then fold the exposed butter sheet at the bottom up over the top, so the dough is completely enclosed in the butter sheet.
Place the dough on a lightly floured surface, short end towards you.
Roll out to a rectangle, keeping the edges as even as possible.
Fold the top quarter down and the bottom quarter up so they meet neatly in the centre.
Then fold the dough in half along the centre line. This is called a book turn.
Wrap the dough in cling film and chill for 25 minutes.
Remove the dough from the fridge and make another book turn.
Wrap the dough in cling film and chill for 25 minutes.
For the filling, mix the granulated sugar and the cinnamon together in a bowl.
On a lightly floured surface roll out the pastry to a rectangle as before and sprinkle over the sugar.
Make another book turn to incorporate the sugar, then roll out the pastry 1cm/½in thick, to a rectangle 12x20cm/4½x8in.
Roll up the pastry from the short end like a Swiss roll. Wrap in cling film and chill for 25
minutes.
Preheat the oven to 200C/180C Fan/Gas 6. (U.S. 392/356 F convection
Line 2 baking trays lines with silicon sheets or non-stick baking paper.
Trim the ends of the roll and cut into 8 x 1cm/½in thick slices. Dust the work surface heavily with icing sugar and roll each piece of dough out very thinly, turning to coat in the sugar and to prevent sticking.
My first batch of Arlettes were not pretty...
My second attempt was much better
Place the biscuits on the prepared trays and bake for 5 minutes.
Remove from the oven, carefully turn the biscuits and cook for a further 3-4 minutes, or until golden-brown.
Transfer to a wire rack to cool.
Crispy, cinnamon-y and perfect with a dish of homemade Allagash White Beer Ice Cream!


No comments:
Post a Comment
Thanks for your comments! (^_^)